1 . Introduction
2 . My Setup
3 . What is Name-That-Hash?
4 . Why use Name-That-Hash?
5 . How to use Name-That-Hash?
6 . Summary
This post is designed to introduce you to the tool Name-That-Hash.

1. Introduction
Welcome to the forty-eighth blog post of 100 tools in 100 days.
Find Name-That-Hash @ GitHub here.
pyWhat was created and is maintained by Bee Skerritt and others from the HashPals contributors, find him at:
HashPals Github
GitHub
LinkedIn
Personal Blog
2. My Setup
For running the Name-That-Hash tool, I used Kali Linux in a VMware Workstation 16 Player virtualized environment.
3. What is Name-That-Hash?
Name-That-Hash is a tool written in Go that identifies hashes by their type. You may remember a similar tool from day 017 of this series called Hashid.
4. Why use Name-That-Hash?
Name-That-Hash is designed to be faster than Hashid and more accurate with results that are easier to understand.
Knowing the hash type of a password makes it easier when determining what options to use in common hash cracking utilities.
5. How to use Name-That-Hash?
Installing Name-That-Hash is easy and done with pip3.
Step 1:
To install Name-That-Hash enter the following command into your terminal:

pip3 install name-that-hash

If you saw the below message during installation then proceed to step 2a, otherwise proceed to step 3.

We need to add the path to the Name-That-Hash binary to the environment so that when you type the command, the program works.
If you are using Kali you likely are using .zshrc which is where your environment paths get loaded for each shell window.
Step 2a:
Enter the following command to modify your .zshrc file:

sudo nano ~/.zshrc
Step 2b:
Scroll down using the arrow down key until you find the
lines that say "export PATH=XXXXX"

enter the following line below:

export PATH=$HOME/.local/bin:$PATH

This path choice only works if your warning matches the warning I
showed in step 1, otherwise, adjust the path to match your warning message.

Step 2c:
Save and close the .zshrc file by entering the following:

Ctrl+X
Y
<Hit Enter>

This will close (Ctrl+X), ask if you want to save (Y),
confirm and close (<Hit Enter>).
Step 2d:
In your terminal enter the following command to update your system to
see the path you added in step 2c:

source ~/.zshrc
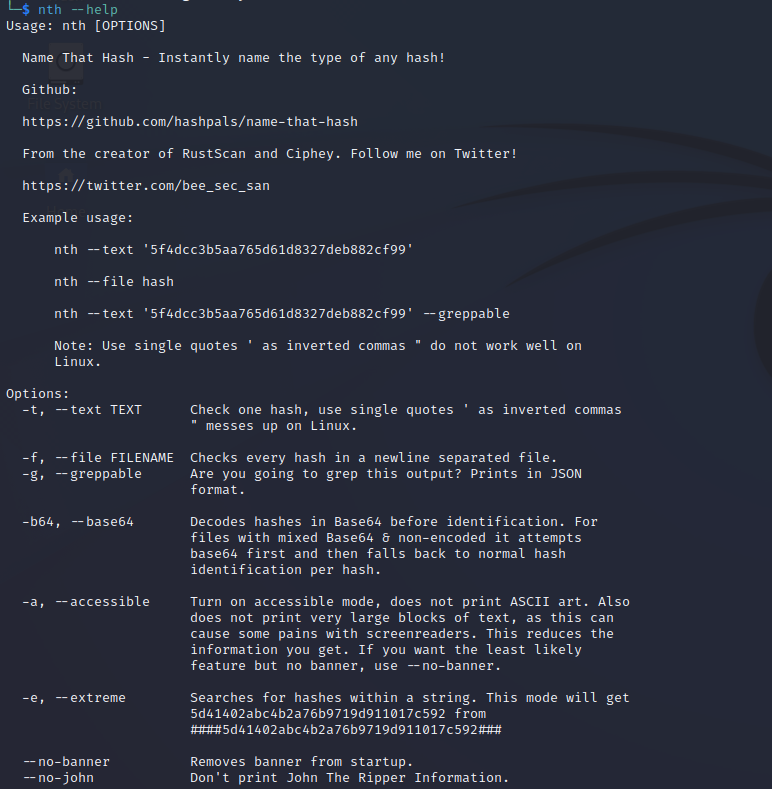
Step 3:
Now that Name-That-Hash is installed it is very easy to use, in your
terminal enter the following command:

nth --help
To demonstrate its use, I am going to use the same hashes from Day 017 blog on Hashid.
$DCC2$10240#tom#e4e938d12fe5974dc42a90120bd9c90f
127e6fbfe24a750e72930c220a8e138275656b8e5d8f48a98c3c92df2caba935
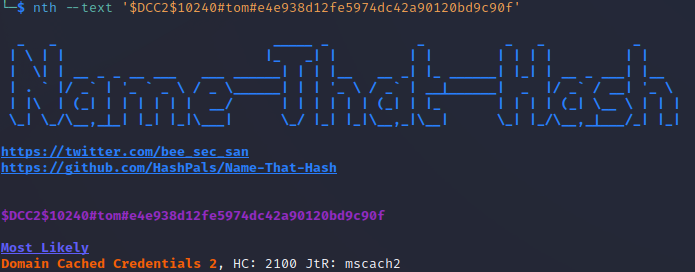
Step 4:
Enter the following command for example 1:

nth --text '$DCC2$10240#tom#e4e938d12fe5974dc42a90120bd9c90f'
Step 5:
Enter the following command for example 2:
nth --text '127e6fbfe24a750e72930c220a8e138275656b8e5d8f48a98c3c92df2caba935'
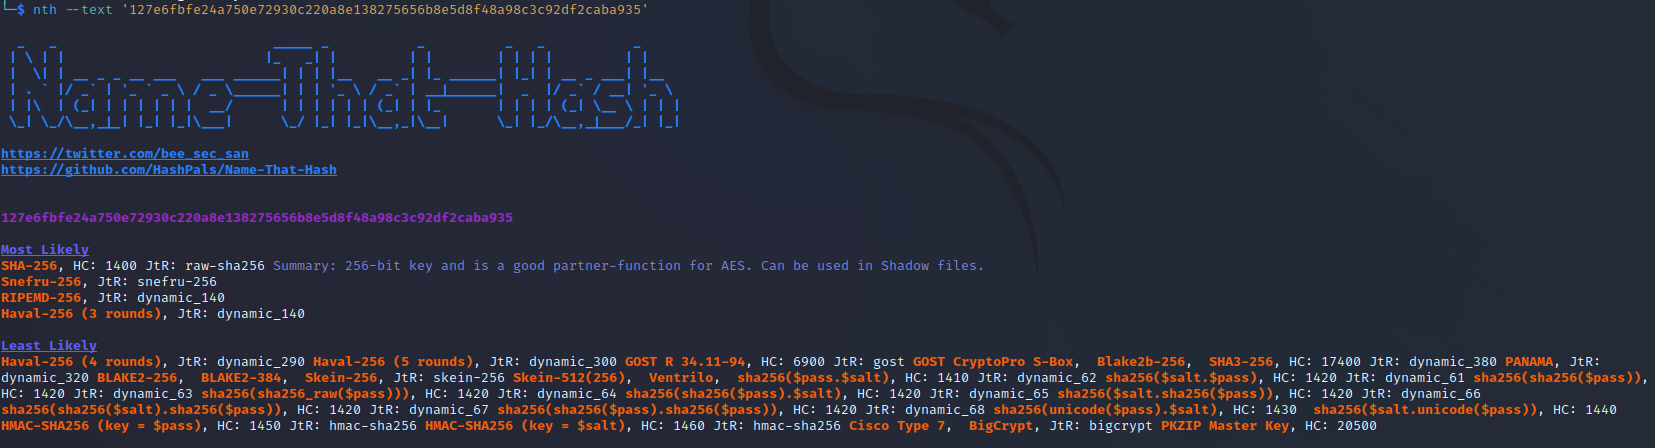
From our results, we see that example 2 which Hashid on day 17 previously thought was Snefru-256 (incorrect) is being correctly identified by Name-That-Hash as SHA-256 (correct).
6. Summary
Name-That-Hash is a great alternative for hash identification tools. It is extremely quick, accurate, and easy to use.
Additionally, if you want to use a web based version of Name-That-Hash you can by going to https://nth.skerritt.blog/.
I hope you enjoyed this blog post.
Thanks for reading!
If you have suggestions for what tool to cover next, contact me!