1 . Introduction
2 . My Setup
3 . What is Netdiscover?
4 . Why use Netdiscover?
5 . How to use Netdiscover?
6 . Summary
This post is designed to introduce you to the tool Netdiscover.

1. Introduction
Welcome to the eleventh blog post of 100 tools in 100 days.
Find Netdiscover here.
Additionally, Netdiscover comes as one of the tools in Kali Linux.
2. My Setup
For running the Netdiscover tool, I used Kali Linux in a VMware Workstation 16 Player virtualized environment.
Additionally, to detect other devices I ran a Metasploitable2 instance in a VMware Workstation 16 Player virtualized environment.
3. What is Netdiscover?
Netdiscover is a network enumeration tool that allows a user to discover hosts and MAC addresses quickly on networks.
Netdiscover is quite simple to use with few additional options and therefore makes it a simple and lightweight host detection device.
Netdiscover allows ARP scanning as well as stealth mode without sending ARP packets.
4. Why use Netdiscover?
I would use Netdiscover in the event I want to identify hosts and associated MAC addresses quickly.
Netdiscover is extremely fast and simple to use, I would use Netdiscover when I only need hosts / MAC addresses and not further scan details. If I needed a deeper and different scan I would of course default to using Nmap, which will be in a future blog post!
I would not use netdiscover to perform active scanning if you are worried about sending ARP requests over the network. Any traffic capture or detection system will detect your requests.
5. How to use Netdiscover?
Note: You may need to run Netdiscover with root permissions (sudo).
Step 1:
Netdiscover is really simple to use.

In your terminal type:

netdiscover -r <IPaddress/cidr>

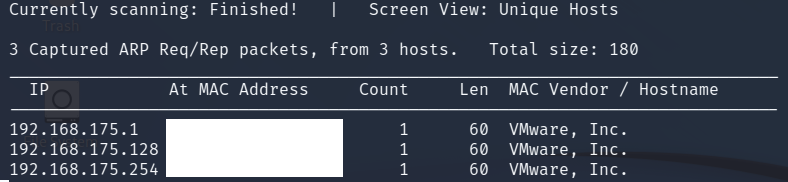
Netdiscover is fast, my scan only has 1 host which is the metasploitable 2 environment. If you have more hosts it may take only slightly longer.
Overall my scan took less than 5 seconds to complete.
Below are the results:
Step 2:
You can tell Netdiscover to use a specific network device using the
following command:

netdiscover -i lan0 -r 192.168.1.0/24
Step 2b:
If you need to figure out what network devices you have and their designated names run the following command:

ip a

This will output each network device and the name for example: etho0, eth1, wlan0, etc.
Step 3:
You can tell Netdiscover to operate in passive mode where no requests are made to hosts.

This is excellent if you want to discover hosts that are communicating on the network.

However, this is a sniffing method and will not find hosts unless they are passing traffic along the network.

Try the command below for passive mode:

netdiscover -r 192.168.1.0/24 -p
6. Summary
In this post, I covered semi-briefly what Netdiscover does and how it functions.
I discussed using netdiscover to actively find hosts on a network.
Additionally, I covered using netdiscover in a passive mode where it only discovers hosts as traffic passes on the network.
Finally, I discussed how to control which network device to use when scanning if you have multiple network devices.
Thanks for reading!
If you have suggestions for what tool to cover next, contact me!